Monday, March 26, 2012

20 Spring Photo Ideas


Spring is such a fun time for photos.  Here are a few ideas...

1  Kids hanging from a tree covered in blossoms.
2  Kids playing outside for the first time in short sleeves
3  Tulips with a dust of spring snow
4  Easter outfits (set the timer so you can be in this one)
5  Kids wearing dollar store bunny ears
6  Easter decorations (especially the sentimental ones)
7  Easter Egg Hunt 
8  Kids in there new Spring shoes
9  Kids smelling Spring flowers
10  Kids picking dadelions 
11  Picture of anything robin's egg blue
12  Kids with their best colored Easter egg
13  Bare toes in green grass
14  Picture of your April Fools joke
15  You and each of your children for Mother's Day
16  Kids with umbrellas in Spring rain
17  St. Patrick's Day green outfits
18  Your first Spring picnic
19  Any kind of Newborn animal
20  Before & After of you spring cleaning projects

Happy Snapping!!

Sunday, March 25, 2012

My Favorite Accessories

This was originally posted on the House of Smiths blog.  Enjoy!!

There are a zillion accessories available to purchase.  Emilie says there are no right or wrong choices.  She says if you something that inspires you, go for it!  Here are some of the accessories she recommend.


Hakuba Monopod and Tabletop Tripod.  Sells for about $28.  Monopods vs Tripods are easier to capture creative angles.  However, a tripod allows you to take timed self portraits.  This is the perfect combo.  Emilie recommends using a monopod whenever photographing crafts, projects, products and home decor.  They allow you to shoot at a lower shutter speed while still getting sharp images.  Learn more about Shutter Speed & Sharper Images Here & Here.


Reflector Disc Soft Gold & White - 32".  Sells for about $25.  Reflectors are my favorite fill light tool.  Using a reflector takes a little practice but the results are amazing.  Read more about using your reflector Here.

Happy Snappers.  Sell for around $25.  If you're photographing kids you must have one of these.  They fit right around your lens.  They come with squeakers and are the perfect tool to get perfect smiles.
Universal Wired/Wireless Remote Shutter Release.  Sells for about $30.  Universal shutter release supports most DSLR cameras, providing a wireless shutter release without the limitations of a traditional cable release.  It is ideal for studio or travel photography, and for the enthusiastic photographer who wishes to have the freedom to move around the subject while shooting.  You can be in the picture rather than behind the camera.  It can also be especially advantageous when taking long exposure photos.  Read a little more about using a long exposure Here.

Photo By Emilie Eye Action.  Sells for $15.  An Action is a recording of a series of commands in Photoshop to which you apply a name.  Later on, you can play that recording back on a different image and have Photoshop do your work for you.   Emilie has created an Eye action that makes Eyes absolutely sparkle.  Read a little more about Emilie's other Actions Here.

Lightscoop® Light Modifier.  Sell for around $30.  Lightscoop® is a smart low-tech device that creates soft, flattering light by redirecting your camera’s pop-up flash to a ceiling or wall.  

Don't let your family photos merely live in your computer.  In Emilie's workshop she teaches 10 rules to live by.  One of them is to print and display your work.  She taught me that my number one skill to improving my photography is my own ability to evaluate my photos.  Printing my images is one of the best ways to view, evaluate and enjoy my images.  Some of my favorite albums companies are Shutterfly, Kodak and Blurb.


This is just one trick of many I learned while attending Emilie's workshop.  Her workshop includes how to shoot in Manual Mode, more lighting rules, her go to poses and her easy Photoshop process for editing. Emilie also teaching ONLINE classes.


Friday, March 23, 2012

Warm it up with Photoshop

This tutorial was originally posted on the Snap Conference website.  If you have even the slightest interest in creative blogging you must come to this conference at Thanksgiving Point on April 19th thru the 21st.  I'll be teaching a class on photography and boy would I love to see you!!

 With winter and gray skies upon us it's more difficult to capture a warm image.  Here's a step by step Photoshop tutorial on how to warm up your photos.

 Click the black/white circle icon (fill or adjustment layer icon) and add a "Gradient Map" layer from the drop down box.
 Double click the Gradient Map to edit the colors.


 Choose a rich dark chocolate color for the shadows & choose a creamy butter color for the highlights.  Click around until you get just the colors that look best to you.  It usually takes a few clicks to get just what you want.  The first few times of running the process takes the longest.  After a few times you find what color you like best and it become much easier and faster.

 From the Blending Mode Drop Down Box choose either Overlay or Soft Light, which ever you think looks better.

 Adjust the Opacity with the Opacity Slider of the Gradient Map Layer until you like it.


This is just one trick of many I learned while attending Emilie's workshop.  Her workshop includes how to shoot in Manual Mode, more lighting rules, her go to poses and her easy Photoshop process for editing. Emilie also teaching ONLINE classes.

Sunday, March 18, 2012

Lighting Tutorial

This post was originally on Less Cake More Frosting.  If you missed it there here it is...


To create the perfect shadows one needs to pay special attention to the direction and strength of the light.


The least flattering light is light coming from directly above our heads.  Light coming from directly above our heads creates very unflattering shadow.  A very fitting example is from Seinfeld.


Check out my 2 faced experiment...


The least flattering direction of light on our faces is from directly above our heads.  Light coming from above our heads casts freakish shadows on our faces.  It makes our eyes dark, it make our noses look big and our teeth and smiles dark.  No good.


The easiest way to solve this problem is don't choose a spot with top down light to take a photo.  Or you can also add a reflector.  A reflector reflectors the light back up into the face filling in the shadows with light.  When you have a bad light direction your goal will be to fill in all the unflattering shadows.


This is just one trick of many I learned while attending Emilie's workshop.  Her workshop includes how to shoot in Manual Mode, more lighting rules, her go to poses and her easy Photoshop process for editing. Emilie also teaching ONLINE classes.


Thursday, March 15, 2012

Equipment Recommendations

I published this on House of Smiths blog a few months ago.  I thought everyone here would like to see it as well.  Enjoy...


You absolutely get what you pay for when purchasing a camera and lens.  The more you spend the better your images will look.  Sometimes you can find a good sale but for the most part the more you spend the better your images.  The lens is just as important if not more important to the look of your image as your camera.  Here are some recommendations for both Camera bodies and lenses.  These recommendations are for people who are serious about shooting in manual mode.

I would suggest purchasing a camera body separately from your lens, not in a kits.  The kit lenses are not good if you'd like pro looking images and want to shoot in manual mode.

Nikon and Canon are the 2 leaders in the industry and both make killer equipment.  I don't recommend one over the other.  


I'll list them most to least expensive.


Nikon D5100 sells for around $696.  This is the most expensive of the Entry level cameras.  This camera produces super sharp crisp images.  A really fun feature that sets this camera apart is it's 3 inch vari-angle LCD monitor opens horizontally up to 180˚ and flips up and down.  Really handy for capturing self portraits.  Only compatible with the AF-I and AF-S series lenses which are a bit more expensive than the AF-D and G series.

Canon EOS Rebel T3i sells for around $669.  This camera is super sharp and has the highest resolution of any of the entry level camera at 18 megapixels.  It also has the 3 inch vari-angle flip monitor.  
Nikon D3100 sells for around $596.  This is the only entry level camera that you can not buy as a body only.  It comes with a 18-55mm 3.5-5.6f lens.  It's not a lens I recommend for portraits.  It has a large sensor for the price (which translates to sharper images).  Only compatible with the AF-I and AF-S series lenses which are a bit more expensive than the AF-D and G series.
Canon EOS Rebel T2i is the least expensive camera I recommend.  It sells for around $579.  It is comparable to the T3i but does not include the vari-angle flip screen.


For the advanced user or someone who have a little more to invest these are the 4 cameras I recommend:
(These are not considered professional cameras, rather high-end consumer camera.  You are welcome to contact me with questions about professional equipment.)

I get asked all the time do I need to spend a lot of money in order to get a great photo?  My answer is no, but your images sure will look better if you do spend the extra money.  The major difference in your images as you spend more money is the quality of the crispness, sharpness, color, contrast, white balance... well okay everything about your images will look better!  However, the biggest aspect that will determine the quality of your images is... YOU!  That's why I highly recommend educating yourself.

Canon EOS 7D. Sells for about $1,400
Nikon D7000.  Sells for about $1,300
Canon EOS 60D. Sells for about $1,000
Nikon D90. Sells about about $850
**These Nikon bodies are compatible with the "D" series lenses which is an advantage because "D" series are less expense than "G" series lenses.


Now let's talk lenses.  Like I mentioned, I would discourage you from purchasing a Kit that includes a camera and lens.  I would recommend purchasing the camera and lens separately.   Here are my favorite 4 lens for Canon and Nikon.  These lenses complement each other and would make the perfect combination for the ultimate complete set.

(These are not considered professional lenses, rather high-end consumer quality.  You are welcome to contact me with questions about professional equipment.) 


50mm 1.8F for Canon.  Sells for about $99
50mm 1.8F for Nikon D3100 & D5100. Sells for about $214

This is the best bang for your buck of any camera equipment.  Everyone, beginner and professional alike should own this lens.  It's often referred to as the Nifty Fifty.  Perfect for everyday situations and particularly good for low light inside shots.  Ideal if you take detail shots of products or crafts.

Tamron  28-75mm f/2.8 for Canon.  Sells for around $449
Tamron  28-75mm f/2.8 for Nikon.  Sells for around $449
  
Tamron is an after market brand.  The comparable lens in the Canon & Nikon brands are between $1500-$2000, the Tamron version only $449!!  It's received good reviews, the only complaint has been that it's a bit sluggish to focus, but for a $1500 saving I'd take a bit sluggish all day long.  This is your go to lens when photographing children.
Tamron  70-200mm f/2.8 for Nikon.  Sells for around $699
This is the sister lens to the Tamron lens shown above.  Again, it's a huge savings over the Canon/Nikon brand lens.  This is your go to lens when photographing older children and families.  Typically this lens is used outside.  The focal length is a little too long to be used in small spaces.  You'll melt when you see the images that come out of this lens. 


Tamron AF18-270mm f/3.5-6.3 for Canon.  Sells for around $625 

Tamron AF18-270mm f/3.5-6.3 for Nikon.  Sells for around $625 

This is the perfect everyday lens.  It's perfect for birthday parties, vacations, family reunions, kids playing at the park.  The large range of the focal length makes this lens very versatile.  I would not recommend this lens for portraits.

 Just a few of the things you'll learn in my workshops:
-Shooting in Manual Mode
-Perfect Lighting Every time
-My Favorite Poses
-The Magic of Photoshop
  
Photo By Emilie Workshops:

Wednesday, March 14, 2012

Facebook Giveaway


GIVEAWAY TIME!! 

I'm giving away an Easter Event Photo Session. The Easter Event is Friday & Saturday, March 30th & 31st in Draper UT.  Click Here to see the details about my Easter Event.


Giveaway ends at Noon on Wednesday, March 28th.

(Next week I'll be giving away my new Soft & Sharp Action set)

Sunday, March 4, 2012

Sharp & Soft Action Sets


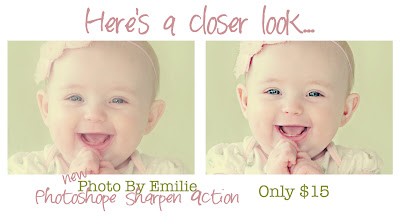
I have received dozen of emails and inquires about how I make my images so sharp.  It does have a bit to do with selecting the correct manual setting in your camera.  However, I also sharpen all my images in Photoshop.  I wanted to pass along my tricks.  I created a set of actions, the action set includes 3 actions: 
-Way Sharp
-Perfect Sharp
-A Touch Sharp


I couldn't stop there!!  I decided to also create a Soften Action.  This Action Set also includes 3 separate actions: 
-Way Soft
-Perfect Soft
-A Touch Soft


The action set includes a video tutorial on tricks to using the actions.

Actions are compatible with CS AND Elements 9 & 10.
Also comes with a step by step video for all other versions of Elements.